
Vector database sharding
Multimodal search
JaguarDB quantization
JaguarDB Vector API
Best Vector databases
JaguarDB in Docker
Setup JaguarDB with tar package
Setup JaguarDB on multiple nodes
Vector index sharing
How zeromove works
Video introduction
|
|
Setup JaguarDB
There are two types of servers for operation: Jaguar server and HTTP server. The Jaguar server is required.
The HTTP server is optonal. The HTTP server is a gateway to serve HTTP clients which do not rely on platforms and languages.
If the HTTP server is not deployed, then clients must be launched from the Ubuntu 22.04 platform.
We first describe how to set up Jaguar server, then the HTTP server in the following sections.
There are four methods for setting up Jaguar server on your Linux system.
1) One command installation: This method involves only running one command. This approach provides a simple way to install and run the JaguarDB and HTTP gateway in any flavor of Linux systems.
2) Docker Container Deployment: The first method involves deploying JaguarDB using Docker containers. This approach offers ease of management and scalability.
3) Host-Based Installation and Cluster Configuration: The second approach is to install JaguarDB individually on each host and then establish connectivity between these hosts by sharing a common cluster configuration file. This method provides more control over the installation location and allows for fine-tuned cluster management.
4) Public Key Authentication and Cluster-Wide Installation Script: The third method involves setting up public keys on all hosts within the cluster. Subsequently, you can run an installation script from one node within the cluster to deploy JaguarDB on all the nodes in the cluster. This approach streamlines the deployment process while maintaining security through key-based authentication. You can consider these options for selecting the most suitable approach for your specific requirements when setting up JaguarDB on your Linux system.
For methods three and four, you need to download the software from a desktop computer by visiting the Download Page
Method One: Quick Setup
To deploy JaguarDB on any Linux host, you can use the following command to quickly setup JaguarDB.
curl -fsSL http://jaguardb.com/install.sh|sh
Please note that the installed package include both the Jaguar vector database and HTTP gateway. The servers will be up running automatically after successful installation.
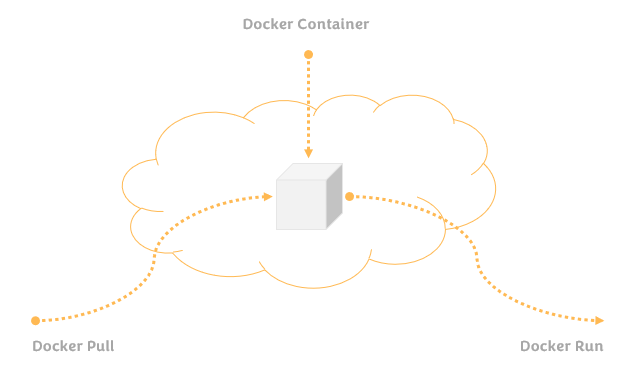
Method Two: Docker
To deploy JaguarDB, you can use docker to quickly setup JaguarDB.
docker pull jaguardb/jaguardb
docker run -d -p 8888:8888 -p 8080:8080 -p 4433:4433 \
--name jaguardb jaguardb/jaguardb
To launch the JaguarDB client terminal to interact with JaguarDB server:
docker exec -it jaguardb \
/home/jaguar/jaguar/bin/jag \
-apikey demouser
Please note that package jaguardb contains the HTTP gateway as well as the vector database server. Package jaguardb opens up ports 8080 and 8888, 4433 (secure). Port 8080 is for HTTP traffic, 4433 for https traffic, and port 8888 for data exchange between the HTTP server and the database server or between the client and the database server. Note that the benefit of a HTTP server is that it provides a REST API to clients that run on any platforms such as MacOS, Windows, and Linux (not just on Ubuntu 22.04).
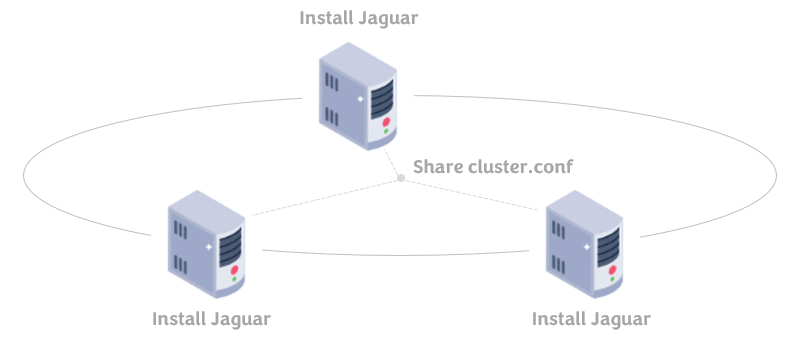
Method Three: Node Based
In this approach, you have the flexibility to download and manually install the JaguarDB program (found in the jaguar-n.n.n.tar.gz package) on each host within your database cluster. Subsequently, you will need to configure the $JAGUAR_HOME/conf/cluster.conf file, which should be distributed to all the hosts in your system.To initiate the process, visit the download page at www.jaguardb.com/download.html and follow the provided link to obtain the tarball on your host. We will present the following example to illustrate the installation process using this method.
If you intend to configure JaguarDB on three hosts with the following IP addresses: 192.168.2.100, 192.168.2.101, and 192.168.2.102, you can easily achieve this by copying the tar file, jaguar-n.tar.gz, to each of these hosts. Here is the command to do so using the Secure Copy Protocol (SCP):
scp jaguar-n.tar.gz 192.168.2.100:~/
scp jaguar-n.tar.gz 192.168.2.101:~/
scp jaguar-n.tar.gz 192.168.2.102:~/
Next, you can proceed to install JaguarDB on each of these hosts using the following command:
ssh 192.168.2.100 "tar zxf jaguar-n.tar.gz; cd jaguar-n; ./install.sh"
ssh 192.168.2.101 "tar zxf jaguar-n.tar.gz; cd jaguar-n; ./install.sh"
ssh 192.168.2.102 "tar zxf jaguar-n.tar.gz; cd jaguar-n; ./install.sh"
The script install.sh provides the flexibility to specify an alternative installation directory using the "-d " option. This allows you to install JaguarDB to a location of your choice, rather than the default location, which is "$HOME/jaguar".For example:
ssh 192.168.2.100 "tar zxf jaguar-n.tar.gz; cd jaguar-n; ./install.sh -d /opt/jaguar"
ssh 192.168.2.101 "tar zxf jaguar-n.tar.gz; cd jaguar-n; ./install.sh -d /opt/jaguar"
ssh 192.168.2.102 "tar zxf jaguar-n.tar.gz; cd jaguar-n; ./install.sh -d /opt/jaguar"
Please ensure that the directory "/opt/jaguar" is owned by the user account executing the SSH command. No specific user account is necessary for the installation and operation of the Jaguar server software.
A cluster configuration file "cluster.conf" should be prepared and distributed to all the nodes within the cluster:
vim cluster.conf
192.168.2.100
192.168.2.101
192.168.2.102
scp cluster.conf 192.168.2.100:~/jaguar/conf/
scp cluster.conf 192.168.2.101:~/jaguar/conf/
scp cluster.conf 192.168.2.102:~/jaguar/conf/
If you have installed Jaguar in /opt/jaguar directory, you should replace "~/jaguar/conf/" with "/opt/jaguar/conf/"in the commands above.
The Jaguar server can be started using the jaguarstart command, with the "$JAGUAR_HOME" directory indicating the directory where Jaguar is installed, either$HOME/jaguar or /opt/jaguar as illustrated in the above example.
cd $JAGUAR_HOME/bin
./jaguarstart
Method Four : Cluster Wide
This method uses a downloaded tar ball and a script to install JaguarDB software on all hosts for your database cluster. To implement this, ensure that you employ identical account credentials across all hosts. This process will establish trusted public authorized keys for seamless SSH login, eliminating the need for repetitive password input.
Suppose you have downloaded jaguar-n.tar.gz to host 192.168.2.100, you can proceed with the followg steps to setup cluster-wide installation of JaguarDB:
# On each node, i.e., 192.168.2.100, 192.168.2.100, and 192.168.2.102
$ sudo useradd jaguar
$ sudo passwd jaguar
Please ensure that you use the same password on all nodes. Subsequently, from a designated node, such as node 192.168.2.100, you can execute the following steps:
su - jaguar
tar zxf jaguar-n.tar.gz
cd jaguar-n
At this point, you should create a file containing all the nodes within the cluster:
vim HOSTFILE
192.168.2.100
192.168.2.101
192.168.2.102
Following this, all that remains is to execute the following command:
./install_jaguar_database_on_all_hosts.sh \
-f HOSTFILE
In the installation process outlined above, the establishment of trusted public keys will occur for the user account "jaguar" across all nodes within the cluster. If you would like to install Jaguar to a different directory, you can execute the following commmand:
sudo mkdir -p /opt/jaguar
sudo chown jaguar.jaguar /opt/jaguar
./install_jaguar_database_on_all_hosts.sh \
-f HOSTFILE -d /opt/jaguar
The Jaguar server processes can be initiated, on all the nodes in the cluster automatically, with the jaguarstart script:
cd $JAGUAR_HOME/bin
./jaguarstart
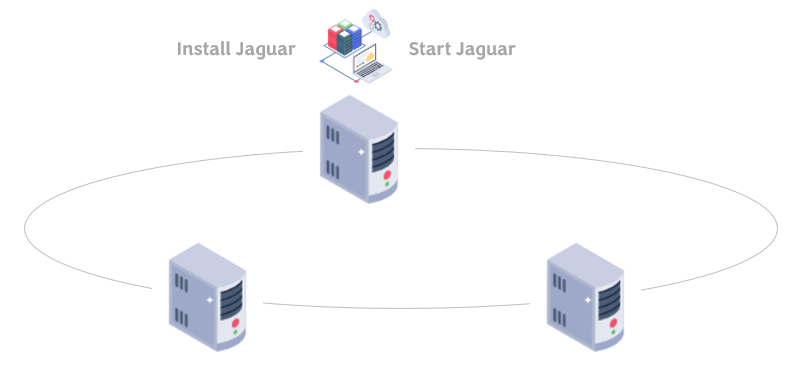
Using this method, you can efficiently set up and manage Jaguar server processes on all nodes within the cluster from a single node.
HTTP Server Setup
In tandem with the JaguarDB server, the HTTP gateway provides a universal endpoint for clients to seamlessly interact with Jaguar servers. This gateway serves as a proficient proxy, facilitating the relay of commands from clients to the backend database servers. Consequently, clients are liberated from the constraints of relying on a specific Linux platform. In the methods 1 and 2 for installation of JaguarDB, the HTTP gateway is by default integrated in the package. In methods 3 and 4, the HTTP gateway can be optionally installed. To set up the Jaguar HTTP gateway on any Linux system, users can follow these straightforward steps:
1) Acquire the file: wget http://jaguardb.com/download/fwww_3.5.8.tar.gz
2) Execute the ./install.sh script in the extracted tar file to start the setup process
3) Navigate to the $HOME/fwww/bin_dir directory and run ./start_all_servers.sh
It is important to note that the HTTP gateway server process should ideally run on the same host as one of the Jaguar servers, although it can also be deployed on separate hosts within a local area network for enhanced flexibility. The value of configuration parameter JAGUAR_SUPER_ADMIN_API_KEY in the fwww.conf file should be read from the configuration file $JAGUAR_HOME/conf/server.conf on one of a JaguarDB servers. When you open the file conf/server.conf, you will see SERVER_TOKEN and you can use its value for the JAGUAR_SUPER_ADMIN_API_KEY entry in the fwww.conf configuration file. Note that JaguarDB server should be installed prior to setting up the HTTP gateway server. If JaguarDB server is restarted, you should restart the http server.
Once the http gateway is setup, you point your browser at: http://IP:8080/login.html to login to your account and manage your data, where IP is the IP address of the server where the fwww http server is installed.
Setup JaguarLite
JaguarLite is a powerful, embedded vector database designed to run seamlessly on any Linux system without requiring server setup or external services. It is a streamlined version of JaguarDB, offering the full capabilities of a vector database in a compact, self-contained form factor ideal for edge devices, embedded AI systems, and local AI applications.
JaguarLite delivers:
- Standalone operation — no server process, no dependencies
- Full-featured vector search and indexing identical to JaguarDB
- Multi-tenant architecture — each tenant can be maintained by its own isolated databases and tables
- Flexible data support — including vector, time-series, and geospatial data
Developers can integrate JaguarLite easily using:
C++ API — including header files, static libraries, and shared libraries
Python API — for fast prototyping and AI/ML integration in Python projects
Installation is quick and hassle-free. Simply run:
curl -fsSL http://jaguardb.com/jaguarlite.sh|sh
The installation package includes ready-to-use code examples, enabling developers to rapidly build and deploy vector-powered applications on everything from cloud nodes to AI edge devices. JaguarLite combines simplicity, speed, and rich functionality, making it a versatile tool for modern data intelligence at any scale.
Development Setup
For software developers looking to harness the power of the Jaguar vector database for advanced AI applications, there are two convenient methods to get started. You can either download the Jaguar Software Development Kit (JSDK) as a tarball, named "jaguar-n.n.n.tar.gz", or employ the simplicity of Python packages. With the JSDK or the pip installation, you can quickly dive into programming and engage with Jaguar servers to build cutting-edge AI solutions. The three approaches are described below:
JSDK Download Visit www.jaguardb.com/download.html to download JSDK and find examples in the client directory
REST Client Run the command "pip install -U jaguardb-http-client" for client programming over REST protocol. This requires setting up jaguar http gateway server to accept commands from the clients and send them to the jaguar server. This package is pure Python and does not reply on any platform.
Socket Client Run the command "pip install -U jaguardb-socket-client" for client programming over TCP/IP socket. This packages relies on Ubuntu 22.04 platoform and bypasses the http gateway.
Please note that the JSDK is developed for Ubuntu 22.04 Linux distribution. More OS platforms will be supported in the future. Users are encouraged to visit github.com/fserv/jaguar-sdk for guides and examples.
|